Garmin Fish Finder Transducer
Brand: Garmin | Device: Transducer | Year: 2024 | Our Score: 9.5/10
A transducer is a device that sends a signal directly down to the bottom of a boat, either mounted on the transom, thru-hull, or in-hull.
When moving slowly, the transducer works in the same way.
It sends a signal, either a signal or a pulse, to the bottom, which bounces up and returns to the transducer.
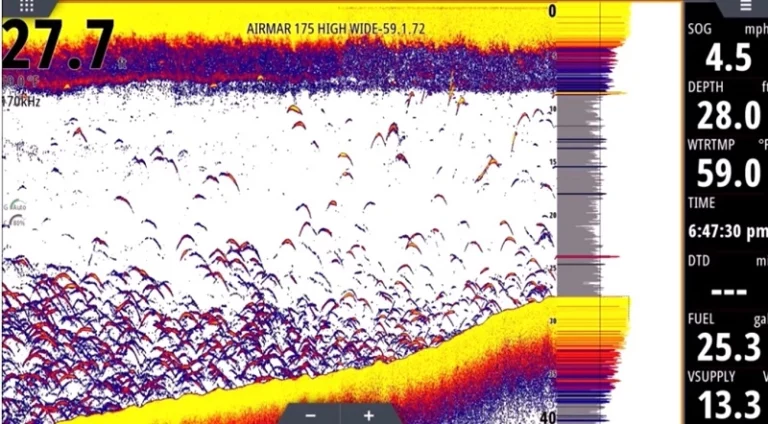
Any interrupted pulses that travel will show up in the A-scope, which is what’s under the transducer in real-time.
The colors indicate the strength of the return, with yellow being the strongest and blue being the weakest.
The transducer’s behavior is similar to that of a flashlight, shining down like a small circle on a hand.
It shines straight down and gets wider as it goes, allowing for more fish to be seen towards the bottom.
However, the narrow beam at the top of the transducer results in fewer returns and fewer fish breaking the beam.
As the cone becomes deeper and wider, more things are interrupted, resulting in more returns.

When it comes to marine equipment and advanced fishing gear, Garmin Fish Finder Transducers stand out as a leading choice for anglers and boating enthusiasts.
These devices, rooted in cutting-edge sonar technology, have transformed the way fishermen locate and target fish.
The transducer types available with different Garmin models offer varied sonar beams and depth ranges, ensuring that users can navigate and fish with precision.
Whether you’re a novice looking to understand the installation process or an expert aiming to maximize your catch, diving into the world of Garmin transducers provides a comprehensive insight into modern-day navigation systems and fishing techniques.
I could finally select the ideal one without hours of research. This guide will cover fish finder transducers: types, installation, connection, and buying tips. Plus, I’ll answer some common questions to give you a complete picture.
Let’s get started!
What Is a Transducer on a Fish Finder?
The transducer is the main sensor for your fish finder. It sends sonar signals into the water and receives the echoes.
To get a clear underwater image on your fish finder, you need to follow this important process.
The transducer uses waves to scan underwater and find objects, structures, and fish.
The fish finder uses sonar waves to make a picture of what’s under the water.
The transducer is the part that connects with the underwater world.
To find good fishing spots, get current info on fish, water depth, and underwater structures. By doing so, it significantly enhances your chances of a successful fishing trip.

How Important Is the Transducer for a Fish Finder to Work?
The transducer is one of the essential parts of every fish finder.
Without it, locating fish beneath the water’s surface would be like trying to navigate a room in the dark.
The device sends out sound waves to scan underwater and gives data to the angler.
The device changes electrical pulses to sound energy and sends it into the water. The energy moves through the water, hits objects, and comes back to the transducer.
This helps the fish finder show what’s under the water.
A transducer that produces 500 or 600 watts can detect fish and the bottom up to 400 feet deep.
Anglers need this skill to fish in different places, like lakes and the ocean.
Moreover, the quality of the transducer affects the noise level of the sonar signals. When it’s quieter, the fish finder’s display shows a clear and accurate view of underwater.
To sum up, the transducer is not just an extra part but a necessary part for a fish finder to work well. It is essential for a successful fishing trip.
How Does a Fish Finder Transducer Work?
A fish finder transducer is a fascinating piece of technology that acts as the eyes and ears of the fish finder.
It works by emitting pulses of sound waves into the water column. The boat uses ultrasonic waves to send sonar signals. The transducer is usually on the boat’s bottom.
The process begins with a conversion of energy. First, we change DC electricity to AC. Then, we change this electrical energy into sound. Vibrating crystals in the transducer make the sound. The crystals send sonar pulses into the water at a certain frequency.
The sound waves move through water and hit things like fish, plants, and the ocean floor.
When they hit an object, they bounce back to the transducer as echoes. A head unit with a display connects to the transducer to send and receive sonar signals.
The display helps anglers see beneath their boat by showing the water depth and objects.
A fish finder transducer is a device that uses sound waves to help anglers find fish. It’s a valuable tool for fishing.
What Is Inside a Fish Finder Transducer?
The fish finder transducer has many tiny parts that work together perfectly. Central to its operation are piezoceramic elements. They are usually round and made of special materials like barium titanate or lead zarconate titanate. They are covered with silver. These things are very important for sending and getting sonar waves in the water.
The transducer is inside a shaft made of bronze, stainless steel, or nylon. This protects the delicate parts and makes it work better. The piezoceramic elements send sonar waves. The transducer waits for the echoes to come back. The device calculates the time it took for the sound waves to travel. This helps determine the distance between the transducer and the objects it detected.
This information is crucial for understanding the underwater world in detail and accuracy. It helps anglers find fish and understand the ocean floor. The transducer is a useful tool for exploring underwater. It has internal parts, such as piezoceramic elements.
How Fragile Is the Transducer on a Fish Finder?
The transducers are strong in water, but weak in some ways. The durability depends on where the transducer is and how well it’s secured to the boat. The clamps for the transducer cable can break easily, so handle them with care.
Transducers are designed to give precise readings from 0.6m to 100m. They work in various fishing spots, such as shallow streams and deep-sea. Although they do well, these need gentle handling since they have fragile parts.
In summary, transducers are strong but some parts can break. So be careful when installing them for best results.
Will Any Transducer Work With Any Fish Finder?
Not everyone has the same solution for pairing transducers with fish finders. No, you will need to use a transducer that matches the capabilities of the display unit. Certain fish finders, such as the new CHIRP models, need specific transducers to work properly.
These units use advanced sensors to accurately measure their technology.
However, some can mate with a wider range of transducers, giving more pairing options. To get the most out of your fish finder, make sure you have a Transducer that works with it.
Your fish finder usually comes with a transducer that matches its functions. So, you don’t need to find a compatible one. When choosing Garmin chartplotters or fish finders with CV transducers, ensure compatibility.
In conclusion, certain fish finders can use various transducers. However, it’s crucial to check compatibility for optimal performance and functionality.
How to Determine What Transducer Is Needed for a Fish Finder?
The kind of sensor you use affects how clear and detailed your fish finder’s readings are in the water. For deep water use in a professional or commercial setting, 50 kHz transducers are best. They can detect a wider range, making it easier to scan larger areas.
The important thing to remember is that a high frequency gives more detail on your display. Using sonar waves more often improves the clarity and detail of underwater images. You can use this when fishing in shallow waters or to tell things apart.
Transducers can measure water temperature and speed, which is helpful for fishing trips. When choosing a transducer for your fish finder, think about the water depth, level of detail, and additional features.
To choose the right fish finder, know your fishing needs and what the transducer can do. This will make sure you have a successful and fun fishing trip.
References:
Depth Determination, Properties of Transducers, Clojure Transducers
What Transducer Fits a Wide Eye Fish Finder?
To choose a transducer for a Wide Eye fish finder, consider the power ratings of both devices. This ensures compatibility and optimal performance. It is important to match the power ratings of a transducer with your fish finder. This will affect the clarity, detail, and range of the sonar readings.
To find a matching transducer, consult the manual for your Wide Eye fish finder. The manual contains many details about the fish finder’s specifications, requirements, and accessories. To improve your fishing, read the manual to learn about the best transducer for your Wide Eye fish finder.
To choose a transducer for a Wide Eye fish finder, look at the power ratings and check the manual. You should use this to prepare for your underwater expeditions.
Read: https://johnsonoutdoors.widen.net/content/eyb96duzd9/pdf/manual-wideeye.pdf
Understanding the Different Types of Fish Finder Transducers
Having the right fishing gear can help you catch fish and avoid feeling frustrated. Central to this equipment is the fish finder, and more specifically, its transducer. It’s important to know the different types of fish finder transducers. Each type of fishing gear has special features and benefits that work best in certain situations.
The range of transom transducers is vast and varied. They are known for being easy to install. There are also advanced US2 transducers that offer detailed readings. To understand the differences, you need to learn about two types of transducers. These are the 4-pin transducer and the Hybrid Dual Imaging (HDI) transducer.
There are through-hull and in-hull transducers. They each have their own installation requirements and benefits. The tilted element transducer is made for different hull types and has a special design. Each transducer has a unique story and role in enhancing your fishing experience.
Now, let’s look closely at each type. We will discuss their features and how to install them. Get ready to learn about fish finder transducers and make a smart choice with our help!
What Is a Transom Transducer?
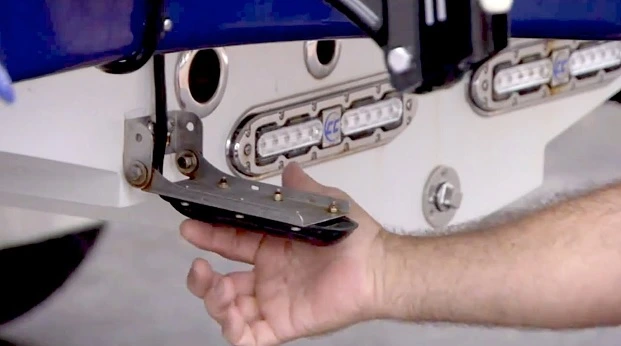
A transom transducer is a special type of transducer that goes on the back of a boat. The positioning ensures that it sits lower than the hull, allowing it to make good contact with the water.
You can mount many of these transducers on the transom with a bracket. This bracket helps you adjust the angle and position for the best results.
Transom transducers are great because they give depth, speed, and temperature all together. Anglers like these because they can do many things and find fish easily.
The Mount Dual Frequency Plastic Transducer has a built-in temperature sensor. Fishermen can use this tool to get water information and make better fishing decisions.
To sum up, a transom transducer is a useful tool on a boat.
Anglers can use it to get depth, speed, and temperature information for fishing trips.
What Is a 4-Pin Transducer?
A 4-pin transducer is a special type of transducer. It has a 4-pin connector and works well with fish finders. The device operates at 77/200 kHz. It provides clear and detailed underwater imaging, making it versatile for fishing.
A 4-pin transducer can fit many boat designs, with angles from 0° to 70°. You can install the device on many boats to improve performance on any vessel.
You can choose cable lengths from 1 Meter to 21 Meters. This makes it easy to install and adjust for your boat and fishing style. You can position the transducer accurately by adjusting the cable length.
A 4-pin transducer can measure depth and temperature. It gives anglers important details about the water. This feature helps fishing by telling you where to find fish and how they act.
To sum up, a 4-pin transducer is a valuable tool for anglers. It has many useful features and provides accurate underwater information.
What Is a US2 Transducer?
The US2 transducer, also called Universal Sonar 2, helps with fishing by giving accurate underwater info. The US2 transducer operates at frequencies of 83/200 kHz. The fishing tool is great for different environments because it has detail and range.
One of the defining features of a US2 transducer is its seamless integration into the boat’s design. The motor’s lower unit has it, and the wiring is inside the strong composite shaft. It keeps everything safe and hidden. The design removes clamps, ties, and wires, making the setup smooth and safe.
The US2 transducer has built-in temperature sensors. It can show water temperature on fishfinders that support it. Anglers find this extra information really helpful. It helps them know the water conditions and make smart choices for catching fish.
The US2 transducer has two transducers. One has a 20-degree cone angle and the other has a 60-degree cone angle. This helps anglers see more of the bottom area. The dual-angle capability helps you see more underwater by showing a wider view.
The US2 transducer connects the fish finder and Universal Sonar 2. It gives accurate readings.
To sum up, the US2 transducer is a valuable tool for anglers. It has advanced features, a secure design, and comprehensive functionality. It helps elevate the fishing experience.
What Is an HDI Transducer on a Fish Finder?
Fish finders use a special technology called HDI transducer, or Hybrid Dual Imaging. The device uses sonar and a DownScan bar to make clear pictures of underwater. Anglers prefer this combination because it helps with sonar and finding fish. It also reduces noise.
HDI transducers have a special feature: they can function as single element transducers. These transducers have only one element but can transmit two alternating frequencies. The Lowrance Skimmer is a great example. It can send different frequencies and work in various CHIRP ranges. This versatility allows for adaptability to different fishing environments and needs.
The HDI transducer is a device that uses sonar and downscan frequencies for scanning. This integration captures many frequencies to give precise readings of the underwater environment. The Down Scan Imaging is a high-frequency tool that shows a realistic view of the sea. It helps us understand the structure, vegetation, and where fish are.
The HDI transducer has two types of sonar: traditional and Down Imaging. Traditional sonar uses Beam Coverage at 83/200 kHz, while Down Imaging uses 455/800 kHz. This transducer provides a wide and detailed view of the underwater world. Anglers can learn more about the sea and find fish by using extensive coverage. They can also identify underwater structures.
An HDI transducer is a useful tool that combines sonar and imaging to see underwater. It’s a must-have for anglers.
What Is a Through-Hull Transducer?
A through-hull transducer is a special type of transducer that is installed differently. The transducer attaches to the boat’s bottom and adjusts for the boat’s angle. This design keeps the transducer in good contact with the water. It gives accurate and reliable readings.
Through-hull transducers are strong and come in 1kW or 2kW models. They are perfect for professional color sounders and offshore use. People like these cameras because they can take clear pictures underwater and in tough conditions.
To get the best results from through-hull transducers, you should drill a hole in the boat’s hull. This method allows you to touch the water directly, making the sonar signal clearer. Installing this transducer is more complex than others, but it’s worth it for anglers. It performs better and is more reliable.
In conclusion, a through-hull transducer is a good choice. It gives clear sonar images and is dependable. The device is installed uniquely and works well, especially offshore.
What Is an In-Hull Transducer?
You can attach the in-hull transducer, or shoot-through transducer, inside the hull. The boat uses sonar signals through its fiberglass to avoid drilling holes. This new design makes installation easier and keeps the boat smooth and intact.
An in-hull transducer has a major advantage: you don’t need to take the boat out of the water to install it. Boat owners find this convenient. It saves time and effort compared to other transducer types. Those types need more complex installations.
To attach the in-hull transducer, use silicone or epoxy. Fill it with propylene glycol. This method helps the transducer work well by sending sonar signals through the hull. It’s secure and stable. Propylene glycol improves the transducer by making sonar signals easier to send.
To sum up, anglers can use in-hull or shoot-thru-hull transducers. We place these transducers inside the boat hull using epoxy. You can install sonar imaging easily and safely using this method. Boat owners like them because they’re easy to install and have a creative design.
What Is a Tilted Element Transducer?
A special type of transducer called a tilted element transducer attaches to the bottom of a boat. Tilted parts make it easier to install and fit smoothly on the boat without needing a fairing block. Many boat owners prefer this design feature because it is efficient and looks good.
The unique aspect of a tilted element transducer is the element inside it, which acts as a leveling agent. The element and hull angle align to direct the transducer’s beam downward. The new design makes sonar readings accurate even if the boat is at an angle.
You can mount this transducer on any fiberglass, metal, or wooden hull by drilling a hole. The transducer is low-profile and has a tilted element to match your hull’s shape. The fitting stays flush with the hull to keep the boat sleek and reduce drag.
A tilted element transducer is useful because it finds certain types of fish, such as tuna. Targeting tuna is easy with the transducer’s ability to direct its beam straight down. This works even in boats with a significant deadrise. The tuna chase bait in the upper water column.
To sum up, a tilted element transducer is a great choice for anglers and boat owners. The unique design allows for mounting in different ways. It gives accurate sonar readings and fits perfectly against the boat’s hull.
How Does a Fish Finder Side Scan Transducer Work?
The side scan transducer on a fish finder shows detailed images of both sides of the boat underwater. Anglers can find fish and underwater structures using SideScan technology. It provides 600-foot views on each side of the boat.
Definition
Side scan is a technology that uses sonar waves to map underwater surroundings on a boat’s sides. Both anglers and researchers find it valuable. It provides insights into the underwater world that traditional sonar cannot.
What is a Side Scan Transducer?
A side scan transducer uses sonar waves to scan the water column and the sea bed on both sides of the boat. This technology shows underwater world clearly, including fish, objects, and the sea floor.
Placement & Mounting Location
The placement of the side scan transducer is crucial for optimal performance. The side imaging transducer is usually best mounted near the back of the boat. This location allows it to easily reach the water on both sides without any obstacles. This spot gives precise sonar readings and reduces interference from the boat’s structure.
Measurements
Side scan sonar takes pictures of things underwater by using sound waves to find where they are. The fish finder can create accurate images of underwater objects and terrain. By analyzing the time it takes for waves to return and the angle at which they receive them, it accomplishes this.
How to Mount Side Imaging Transducer?
Mounting a side imaging transducer requires careful consideration of the location and angle. To get clear side scan images, you need to install the transducer properly. This will ensure that it works effectively.
- Identify Location: Pick a spot at the back where the transducer can reach the water freely on both sides.
- Avoid Obstructions: When picking a location, check for any propellers, protruding hulls, or other equipment.
- Check for Interference: To avoid problems, don’t put the sonar signal close to other transducers or equipment.
- Prepare the Surface: Clean and dry the mounting surface to ensure a secure attachment.
- Apply Mounting Bracket: Position the mounting bracket on the transom or hull and mark the drill holes.
- Drill the marked holes and secure the bracket using appropriate screws or bolts.
- Adjust the Angle: Set the transducer at the correct angle to ensure it is parallel to the water when the boat is in motion.
- Secure the Transducer: Attach the transducer to the mounting bracket and tighten securely.
- Route the Cable: Carefully route the transducer cable to the fish finder, avoiding areas where it might get damaged.
- Secure the cable with cable clamps or ties to prevent it from moving.
- Connect to Fish Finder: Plug the transducer cable into the corresponding port on the fish finder and secure it.
- Test the Installation: Power on the fish finder and test the transducer in the water to ensure it is functioning correctly and providing clear images.
To sum up, a side scan transducer is a useful tool in underwater exploration. Fishermen can use this device to find fish and see underwater views. Proper installation and understanding of its workings are key to maximizing its benefits.
How to Install/Mount a Fish Finder Transducer?
Follow these steps to install your fish finder transducer and find the best catch.
Step 1: Pick the Right Transducer
First, decide what type of transducer you have – it could be transom mount, in-hull, through-hull, or for a trolling motor.
Step 2: Find the Perfect Spot
Look for a spot on your boat that’s smooth and free from any obstacles. It should be in the water and away from any equipment like the propeller.
Step 3: Clean the Area
Before you start, make sure the area where you’re placing the transducer is clean and dry.
Step 4: Mark the Spot
Place the bracket where you want the transducer to go and mark the spots where you’ll drill holes.
Step 5: Drill Carefully
Drill the holes where you’ve marked, being careful not to damage your boat.
Step 6: Seal the Holes
Use a marine sealant on the holes to keep water out.
Step 7: Attach the Bracket
Secure the bracket to your boat using screws or bolts.
Step 8: Set the Angle
If you have a transom mount transducer, make sure it’s set parallel to the water.
Step 9: Secure the Transducer
Attach your transducer to the bracket and make sure it’s tight and secure.
Step 10: Run the Cable
Take the cable from the transducer to the fish finder. Avoid places where it could get damaged and use clamps or ties to keep it in place.
Step 11: Connect to the Fish Finder
Plug the cable into your fish finder and make sure it’s secure.
Step 12: Test it Out
Turn on your fish finder and check how the transducer works in the water. Adjust it if you need to.
Step 13: Make Final Adjustments
Based on your test, make any last-minute adjustments to the position and angle of the transducer.
Things to Look for When Choosing a Fish Finder
1. Transducers
The transducer is the heart of a fish finder.
It sends out sonar waves and receives the echoes, giving you a view of what’s beneath the water.
Think about the transducer type, how it’s mounted, and if it works with your boat and fishing style.
2. Transducer Material
Transducers come in different materials such as plastic, bronze, and stainless steel.
To make your boat last longer and perform better, pick a material that suits your hull and the water you’ll be in.
3. Beams and Cone Angles
The beam or cone angle of a transducer determines the width of the area scanned beneath your boat. Wider angles cover more area, but have less detail. Narrower angles provide more detail, but cover less area. Consider your fishing environment and target depth when choosing.
4. B/W Screens Versus Color Screens
Black and white screens are cheaper but show less detail and clarity. If you have enough money, it’s usually better to choose a color screen. Color screens show more detail and make it easier to tell things apart.
5. Screen Resolution
Higher screen resolution means clearer and more detailed images.
Look for a fish finder with a high pixel count, especially if you opt for a larger screen.
6. Dual, Single, and Multiple Frequencies
Fish finders operate at different frequencies. Shallow water needs higher frequencies, and deeper water needs lower frequencies. Dual or multiple frequencies offer more versatility for different fishing environments.
7. Power
The power of a fish finder, measured in watts, affects how quickly it can display readings and how deep it can scan. Having more power is good for fishing in deep water, but less power is enough for shallow water.
8. Water Resistance
Since you’ll be using the device near water, ensure it has a good level of water resistance to prevent damage.
Choosing a fish finder that suits your needs is easy if you consider these factors. It will work well in both shallow waters and deep sea exploration.
Frequently Asked Questions on Transducers
If you found the article helpful, please share it with your friends. Check out my article for the best fishfinders if you want one with great performance.

Gary Burrell
Born in 1989, Gary Burrell is an Electrical Engineering graduate from the University of Tennessee. With 20+ years of experience, he has transitioned from engineering roles to becoming the Chief Content Editor. Gary’s unique blend of technical knowledge and editorial expertise has made him an essential figure in content creation, ensuring clarity and accuracy. His journey from an engineer to an editor showcases his adaptability and commitment to continuous learning.